Category Archives: Vegetables

Red Onion & Rosemary Bread

Standard

Image


I couldn’t decide what kind of bread to make so just made up a basic bread dough while I mulled it over in my mind palace and came up with this bread bad boy. Boom.

Ingredients

400g strong white bread flour
7g instant yeast
7g salt
250ml lukewarm water
1 large red onion
1 garlic clove
small handful of rosemary sprigs
2 tbsp olive oil
2 tbsp balsamic vinegar
1 tsp soft brown sugar

Method

Begin by making the simple bread dough. In a large bowl, weigh out the flour, salt and yeast – remembering to keep the salt and yeast on opposite sides. Mix in half the water with your hands, add the rest in smaller amounts until you get a soft, workable consistency.

Tip out onto a lightly oiled surface and knead for 5-10 minutes until elastic and smooth. Place in a large oiled bowl then place the bowl inside a plastic bag and leave to rise in a warm place for 1-3 hours or until the dough has doubled in size.

Meanwhile, slice the red onion into your preferred shape (I went for small, thin slices) and gently fry in 1 tbsp olive oil, with a crushed garlic clove and finely chopped rosemary for about 5 minutes, until softened. Throw in the balsamic vinegar and sugar and fry for a further minute.

When the bread has proved, tip out onto a lightly oiled surface and gently knead in the onion mixture. You might need a little more bread flour to offset the extra moisture. When the onion is evenly distributed, roughly shape into a rectangle and place in a deep, rectangular tray. Place the tray in a plastic bag and leave to prove once again in a warm place for around an hour.

Brush with about 1 tbsp olive oil before baking at 180-200°C/360-390°F/gas mark 4-6 for around 20-25 minutes until brown and hollow-sounding when tapped.

Enjoy with cheese, chutney or dipped in oil and balsamic vinegar. Scoffscoffscoff.

Carrot & Chickpea Burgers

Standard

I don’t know about you but when faced with a bag full of carrots and not much else I struggle to think of anything other than ‘soup’. However a quick browse on the BBC Good Food website unearthed these burgers. They’re a little more faffy than standard chickpea burgers but they stuck together better than any I’ve previously made so I thought I’d share the method.

Makes 6-8 burgers

Ingredients

350-400g carrots, grated
400g tin chickpeas, drained/rinsed
1 onion, grated
1 clove of garlic, grated
1 tbsp tahini or hummus or maybe even…smooth peanut butter?
1 egg
80-100g breadcrumbs (1 thick slice of bread, grated)
1 tsp ground cumin1 tsp ground ginger
1 tsp ground coriander
salt and pepper to taste
flour

Method

If you have a food processor (which I don’t!) add 1/3 of the carrot, the chickpeas, onions, garlic, spices, hummus/tahini/peanut butter and egg and blitz to a paste. If you don’t have a food processor stick them in a large bowl and use a stick blender to blitz. If you don’t have a stick blender then maybe this recipe is not for you…!

Add a little oil to a frying pan and fry the remaining 2/3 of the carrot for approx. 10 minutes. Add to the paste in the bowl  along with the breadcrumbs and stir together. Get a large plate and cover with a layer of flour. Use your hands to form the carrot mix into patties (eurghk, I hate that word) and place on the flour. Handling gently, flip over and coat the other side in flour.

Using the same frying pan, to save on washing up obviously, fry up the burgers for a few minutes on each side, until golden and crispy. Serve with salad, chutney, flatbreads, mayo, whatever!

No picture ’cause we too greedy. Sozz.


J

Roasted Squash & Blue Cheese Risotto

Standard

For some reason risotto has never really appealed to me. This recipe has made me change my mind. And look, two posts in two days! Shocking.

Serves 4-5, or 2 with plenty of leftovers!

Ingredients

1 medium-large butternut squash, cubed (2cm)
1 large onion, diced
1 garlic clove, finely chopped
300g risotto rice
1.2l vegetable stock
150ml white wine
100-150g blue cheese (we used Danish Blue)
few sprigs of rosemary
1 cup of peas
salt, pepper, basil, oregano

Method

Heat the oven to (200°C/400°F/gas mark 6). Coat the bottom of a roasting tin with some oil, couple of sprigs of rosemary and a sprinkling of black pepper. Add the butternut squash and turn over to coat. Stick in for 20 minutes or so, giving a good shufty every now and again.

Meanwhile heat up a tablespoon of oil in a deep pan. Gently soften the onions for a few minutes before adding the garlic. Stir often so that the onions do not brown. Add the rice and stir well, the rice needs to just gently heat up before you can add the liquid. Stick the kettle on to boil and make up the vegetable stock. After 2 minutes, add the wine – stir well to allow the rice to soak it all up. As the pan dries out somewhat, add a small amount of the stock (around 100-200mls at a time). Wait for the liquid to be nearly all soaked up then add another 100-200ml.

Keep adding stock like this and stir frequently. After half the stock has been added, throw in the herbs. After around 20 minutes, check to see if the rice is soft. Turn off the oven, take out the butternut squash and mash half, returning the other half to the oven to keep warm. Stir in the mashed butternut squash, peas, most of the cheese and heat thorough – you may need a drop more water depending on how saucy you like your risottos. If the rice needs a bit more time to cook, carry on adding small amounts of hot water until cooked, before adding the squash, peas and cheese. Don’t be afraid of adding more water if necessary – it’s really important not to let the risotto boil dry.

Serve in a bowl with a few cubes of butternut squash and crumble over the rest of the cheese. Enjoy your warming winter grub!

Picture to follow…!

J

Feta and Roasted Vegetable Bulghar-Wheat Salad

Standard

This tasty salad makes a nice change from the old ham sandwiches. It’s really easy to make and lasts all week so I tend to make a huge tub of it on a Sunday and it will keep until Friday – not that it ever really lasts that long. It looks really posh too.

Serves: 6-8

Ingredients

1/2 butternut squash, diced into 1-2 cm cubes
1/2 courgette, diced into 1-2 cm cubes
1 medium sweet potato, diced into 1-2 cm cubes
1 tbsp sunflower oil
1 cup of bulghar wheat
1 vegetable stock cube
handful spinach, chopped
100g feta
1 tbsp dried basil
1 tbsp dried oregano
4 tomatoes, chopped
salt and pepper

Method

Heat the oven to 160*C whilst you prepare the vegetables. Throw them into a bowl and coat well in the sunflower oil. Add a teaspoon of each of the herbs and put on a baking tray in the oven to roast for 40-50 minutes until soft. Leave to cool.

Meanwhile, add the bulghar wheat to the a bowl and cover with two cups of boiling water. Add the stock cube and stir well. Cover with clingfilm and leave to soak for 10-15 minutes, stirring a couple of times.

When the bulghar wheat has soaked up the water, add the vegetables to it. Leave to cool before crumbling over the feta, adding the herbs and adding the chopped spinach. Chop the tomatoes and add to the salad. Season well and store in the fridge.

Spanakopita (Greek Feta and Spinach Spiral Pasties)

Standard

More flipping swirly things! (Sorry)

Sadly, I haven’t ever managed to capture a shot of these little things. Once they come out of the oven, they are so elusive, you’ll be lucky if you can catch one for lunch the day afterwards. Inspired by a number of recipes, I have amalgamated the ‘best bits’ of each into this tasty concoction.

Ingredients

6 sheets of filo pastry (no, I don’t make my own – maybe one day I’ll give it a go)
1 bag of spinach (approx 500g)
200g block of feta
1 medium white onion
1 tsp garlic paste or 2 cloves of garlic, chopped finely
handful rosemary (fresh, chopped), or 2 tsp dried
1 tsp dried basil
1 tsp dried oregano
1 medium egg
a sprinkling of plain flour
a little bit of milk

Method

Start by chopping up your spinach quite finely. Squeeze out as much of the water as you can from it, over a sieve to catch any bits you drop. This will seem tiresome, but it really is worth it. Grate the onion and similarly, squeeze the water out of that. Add the squeezed spinach and onion to a bowl. Crumble over the feta, herbs and mix well before adding 1/2 of the egg to bind it all together. Save the last bit of egg for later.

Open out your filo sheets onto a well-floured surface. Begin by brushing egg round the outside of the first sheet. Add 1/6 of your spinachy mixture in a long line along the longest edge of the filo sheet, leaving 1 inch around the edge clear (which should be covered in egg). Fold over the filo 1 inch lengthways and widthways, to fully cover the line of spinach and begin rolling the pastry to form a long sausage. Try not to catch any big bubbles of air.

When you have a spinachy sausage, brush one side of it with egg and use this as the glue to hold your spiral together. Roll the sausage around one end fairly tightly and use a bit of egg to glue down the last centimetre. You should have something that looks like this.

Brush the outside with egg and place on a greased tray. Repeat for the remaining 5 sheets of filo.

Bake in the oven at 160*C for around 20-25 minutes until golden brown and crispy.

Take a photo before they all get nommed.

Curried Aubergine Pie

Standard

Up until recently aubergine hadn’t really registered on my radar. I think before this month I’d only ever used one once, as a layer in a vegetarian lasagne. However I am now developing rather a taste for them, they’re excellent flavour carriers (they are the sponge of the vegetable world) and, so long as they’re not cooked to death, have rather an interesting texture. This recipe takes inspiration from one on BBC Good Food, but adds a few ingredients to really liven it up.

A note on my measurements. I use specific measurements in recipes to make it as straightforward as possible, however I for one never actually measure 2 tbsp tomato purée, I just put in what looks “about right”. Please go with whatever seems reasonable to you – if you really like ginger, add more ginger, if you don’t like ‘hot’ food, use less chilli!

Ingredients

1 large aubergine, cut into 3 cm cubes
4 large old potatoes, peeled and cut into 2 cm cubes
2 large onions, roughly chopped
2 cloves garlic, finely chopped
5 cm fresh root ginger, grated
handful curry leaves, finely chopped
1 tbsp ground turmeric
1 tbsp ground coriander
1 tsp chilli powder
2 tbsp tomato purée
2 tins chopped tomatoes
1 tin chickpeas, rinsed and drained
salt and pepper

Method

Preheat the oven to 220oC/425oF/gas mark 7. Put the potatoes onto boil – they’ll need about ten minutes, though check every so often to make sure they haven’t gone to mush as potatoes are extremely variable I find. Drain and set aside when soft.

In a large saucepan gently fry the onions in oil until starting to go translucent, add a little water whenever they start to stick. Add the garlic, turmeric, coriander, chilli powder, tomato purée, ginger and curry leaves and fry for a further 5 minutes. The turmeric will give the dish (and your cooking utensil!) a wonderful ochre hue. I think that’s possibly the first time I’ve ever used the word ‘ochre’ in a sentence. Blimey, I’ve just done it again! Continue to add water whenever it starts to burn/stick.

Set aside roughly a quarter of the onion mixture before adding the aubergine and frying off on a medium heat for a further 5-10 minutes. Add the chopped tomatoes and chickpeas and reduce until ‘gloopy’ rather than runny. Pour the mixture into a large oven proof dish and top with the potatoes. Top with the onion mixture you set aside earlier – I smeared it all over to imbue (imbue! look at me and my fancy vocabulary today) the potatoes with the turmeric colour.

Bake in the oven for half an hour or until the top layer of potatoes is golden and crispy. No picture this time I am afraid!

J

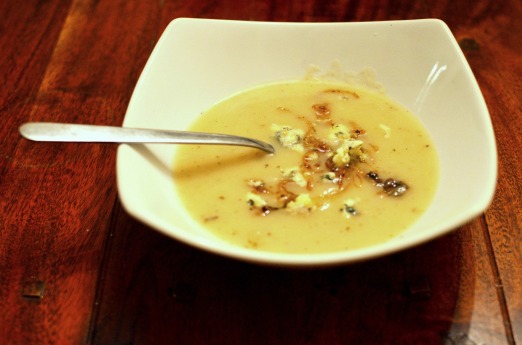
Onion & Cider Soup with Stilton

Standard

This is a great soup taken pretty much straight from the BBC Food website (a fantastic resource if you’ve never used it – also check out BBC GoodFood). Very simple, reasonably quick, damn tasty and quite a bit lighter than the much-vaunted French Onion soup.

Serves 3-4

Ingredients

4 medium onions, 3 diced, 1 sliced
2 cloves garlic, finely chopped
1 large baking potato, cut into 2cm cubes
250ml cider
white wine vinegar
few sprigs fresh thyme (or a pinch of dried)
3 bay leaves
handful fresh rosemary, finely chopped
1 litre stock
salt and pepper
stilton

Method

Heat a big old glob of butter in a large saucepan, add the 3 diced onions, a good twist of salt and pepper and sweat over a low heat for 10 minutes. Add the garlic, rosemary and thyme and continue to sweat for a further 5 minutes.

Add a glug of white wine vinegar, the bay leaves and pour in the cider (I doubt you’ll be able to find a 250ml bottle so I guess you’ll just have to drink the rest!). Increase the heat and reduce by half before adding the stock and potato. Keep on a simmer until the potato is cooked through.

Meanwhile heat a little more butter in a frying pan and once melted added the sliced onion, a little salt and pepper. Fry up over a medium heat until starting to golden. Crumble in a little of the stilton, give a good stir and fry for a further 2-3 minutes. Turn off the hob but leave the frying pan on it while you use a stick-blender to zhuzzzhhh up the soup.

Serve the soup in bowls (bowls, for soup – what is this craziness?!) topped with fried cheesy onions and a further crumbling of stilton. Enjoy with friends – I dare you not to eat the whole lot!

J

Soup-a-soup-a-tasty-soup

Rosemary-Skewered Jacket Potato

Standard

Or alternatively The Most Inventive Thing I’ve Ever Done In The Kitchen. And I didn’t use ginger. I didn’t even use chilli…!

Ingredients

1 baking potato
6-8 stalks of fresh rosemary

Tomato Ragu

1 small onion, chopped
1 garlic glove, finely chopped
8 cherry tomatoes, cut in half
1 tbsp tomato purée
balsamic vinegar
salt and pepper

Method

Preheat the oven to 220oC/425oF/Gas Mark 7. With a sharp knife, carefully cut slits all the way through the potato in a semi-regular pattern.

Optional: Spread a little rock salt on a plate, wet the skin of the potato and roll in the salt. Apparently this helps draw moisture out of the skin so it gets super-crispy.

Put the baked potato in the microwave on the highest setting for approximately 5-6 minutes. Remove when the potato gives under a little pressure from your hand – but be careful, it will be hot!

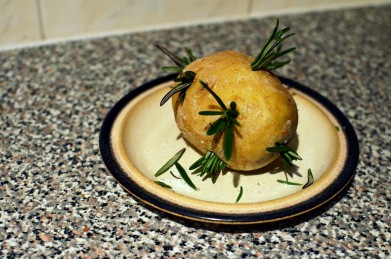
Leave the potato to cool on the side. Fetch your rosemary sticks and use a knife to carefully whittle down the ends to sharper points – this makes for easier insertion…*snigger*. Once your potato is cool enough, poke the rosemary stalks through the pre-cut slits until it comes out the other side. If you have any bit sticking way out of the potato, cut them off and save them or insert them in another slit, otherwise they’ll just crisp up in the oven and be horrid. Once done your potato should look something like this:

unbaked


Put your potato into the oven for 30-40 minutes, until a nice crispy skin has formed. Be careful, leaving it too long will lead to a dried out interior – I’m sure you all know your ovens best so just cook as you would a normal jacket potato. Meanwhile make up your ragu.

Heat a little olive oil in a saucepan and add the onion and garlic. Sweat for 6 minutes before adding a glug of balsamic vinegar. After a further couple of minutes add your tomatoes, tomato purée, a really good twist of pepper and a good pinch of salt. At this stage I also threw in the “leaves” of rosemary that came from cutting my rosemary stalks. Lower the heat, cover and stir occasionally. If anything starts to stick to the bottom of the pan, add a drop of water, stir and recover. Cook for approximately 15 minutes then remove the lid and reduce sauce to a really thick, sticky, gooey, gloopy, pan of wonderment.

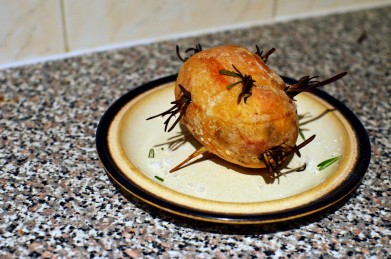
Remove the potato from the oven – remember hot! Tadaa:

baked


Cut open gently – you could remove the rosemary stalks if you want to but I chose to leave mine in and eat around them. Slather your potato with lashing of butter and top with the ragu. Simple yet damn delicious.

J

tasty ragu

Potato & Toasted Chickpea Curry

Standard

Originally I intended this to be a sweet potato and chickpea curry, however when I went to retrieve the desired ingredients the “sweet potato” in my cupboard turned out to be a very red-skinned standard potato! Shocking, I know.

Not to be deterred however, I bravely soldiered on and thus present you with the fruits of my labour. I really think toasting the chickpeas is worth it, you get so much more from the spices and it’s not exactly much of a faff! It looks like a lot of ingredients but it really isn’t complicated to cook. That’s one of the reasons I love curry – you can turn out something incredible with very moderate effort!

Serves 4-5

Ingredients

1 large waxy potato, cut into 2.5cm cubes
2 medium carrots, cut into rounds
2 medium onions, quartered and sliced
4 cloves garlic, finely chopped
1 red chilli (or more if you’re a fan of heat) finely chopped
1 tin chickpeas, drained, washed and patted dry
1 tin chopped tomatoes
1 tin coconut milk
1-2 cups frozen peas
handful green beans
1 cinnamon stick
1 2.5cm piece fresh ginger, grated
glug of golden syrup
parathas to serve

Spice mix

3 tsp curry powder
2 tsp coriander
2 tsp paprika
2 tsp cumin seeds, roughly ground
2 tsp fennel seeds, roughly ground
salt and pepper

Method

Mix up the spices and set aside. In a large casserole dish heat a little oil over a medium heat and add the onions. Sweat for 8-10 minutes before adding a glug of golden syrup, garlic, grated ginger and 2/3 of the spice mix. Give a good stir and cook for a further five minutes, adding a splash of water every now and again if anything starts to stick.

Add the chopped tomatoes, coconut milk, potato and cinnamon stick, bring to the boil then reduce to a simmer. Make sure everything is covered in liquid – if not add a little water. Cover and leave to simmer to 20-25 minutes, stirring occasionally to remove anything stuck to the bottom of the pan. Check the potato and carrot every now and again with a knife – once they start to go soft add the peas and beans and cook for a further five minutes.

Meanwhile heat some oil in a separate frying pan. Add the drained/patted dry chickpeas and fry for 5-6 minutes over a medium-high heat. Shuffle regularly to get an even covering. Add the remaining spice mix and continue to toast for a further couple of minutes until golden brown. Throw into the curry, stir everything around, season to taste (I always keep the spices I have used to hand during cooking so they can be added when necessary). Chug in one final glug of syrup and serve with a paratha.

Look, I even managed to take a photograph this time!

J

Yummy Scrummy Curry

Caramelized Carrot & Ginger Soup

Standard

This is a very similar recipe to the Spiced Parsnip soup from January, which I guess shows the versatility of the recipe for accommodating various root vegetables! It’s a brilliant way to use up a bag of carrots when you can see they’re “on the turn”.

Serves 5-6.

Ingredients

800-1000g carrots, chopped into 1cm cubes (roughly)
800ml vegetable stock
2 medium onions , finely chopped
3-4 cloves garlic, diced
squeeze of golden syrup
2 tsp ground coriander
2 tsp dried rosemary
1 tsp ground cumin
1 tsp cumin seeds, roughly crushed
½ tsp chilli powder
2-3 tsp ready minced ginger (if being lazy like me!)/1 5cm pieces fresh ginger, grated
plenty of salt’n’pepper

Method

Heat a small amount of oil in a large saucepan/deep frying pan. Add the onions, carrots and a good squeeze of golden syrup and stir to coat everything. Caramelize over a medium-high heat*, stirring every so often, for approximately 10 minutes. Mix up the spices and add to the pan, along with the garlic and ginger.

Make up the stock and if anything starts to stick too vehemently to the pan, pour in a little and stir/scrape off. After 5 or so more minutes cooking and stirring add the rest of the stock. Bring to the boil then reduce to a simmer and add a lid. Cook for approx. 20 minutes and check the carrots to see whether they are soft enough to blend/zhuzzhh.

When the carrots are soft blend/zhuzzh with a stick blender/zhuzzher. Obviously the longer and harder you blend, the smoother the soup. I’m not one for adding cream/mascarpone or whatnot to soup as I feel it somewhat undermines the health aspect, but I’m sure you could easily add some.

Serve with freshly baked ficelles (or bake-in-the-oven baguettes if you don’t have time!)

*Ideally I would have roasted the carrots and onions in the oil/golden syrup/spices for approximately 45 minutes at 200oC/400oF/Gas 6, however the oven I had access to was not working so this was not possible!

J