Tag Archives: baking

Grapefruit & Ginger Cake

Standard

The Sunday just gone marked our second attending at Leicester’s excellent Clandestine Cake Club, this time at Deli Flavour in the recently refurbished Silver Arcade. The theme this month was “Memory Lane”, though I must shamefully admit that the caked I baked has no link to memories whatsoever. I just fancied baking a grapefruit cake, so I err…did.

Before I divulge the recipe, I would like to draw attention to the fact that on 3rd May I shall be cycling 100 miles to raise money for Alzheimer’s Research and YoungMinds. Please follow this link if you would like to donate, which would make me and my little legs very happy indeed! In some crazy twist of fate I also believe this is our 100th post. Huzzah!

Ingredients

Cake

1 grapefruit
250g sugar
225g stork/butter/spread
3 eggs
300g self raising flour
1 tsp baking powder
1 tsp cinnamon
1 tsp ground ginger

Icing

50g stork/butter/spread
200g cream cheese
300g icing sugar
zest of a lemon
2 stem ginger balls, finely sliced

Method

Boil the grapefruit in a pan for 20 minutes, drain the water, then repeat. (I must admit I don’t entirely understand the change of water but the recipe told me to so I did!). Leave the grapefruit to cool before removing pips and blending to a pulp (the whole thing, including skin).

Preheat the oven to 18ºC/350ºF/gas mark 4Beat the stork and sugar together. Beat in the eggs one at a time, followed by the pulp. Fold in the flour, baking powder, cinnamon and ground ginger. Divide the mix between two well greased/lined 20cm cake tins. Bake for 20-25 minutes until golden brown. Leave in the tins for a few minutes before turning out onto a cooling rack.

To make the icing, beat the butter and half the icing sugar together. Add the cream cheese, remaining icing sugar, zest and sliced stem ginger and beat until smooth. Keep in the fridge until the cake has cooled enough to ice it. Spread half the icing on each sponge, starting in the centre and spreading it outwards in ever increasing circles. For the bottom layer leave a 1-2cm gap around the edge so that when you place the upper layer on top the icing doesn’t splurge out. Place one on top of the other, decorate with a few strips of lemon zest. Share with friends at your local cake club!

J

DSC_0771

Red Onion & Rosemary Bread

Standard

Image


I couldn’t decide what kind of bread to make so just made up a basic bread dough while I mulled it over in my mind palace and came up with this bread bad boy. Boom.

Ingredients

400g strong white bread flour
7g instant yeast
7g salt
250ml lukewarm water
1 large red onion
1 garlic clove
small handful of rosemary sprigs
2 tbsp olive oil
2 tbsp balsamic vinegar
1 tsp soft brown sugar

Method

Begin by making the simple bread dough. In a large bowl, weigh out the flour, salt and yeast – remembering to keep the salt and yeast on opposite sides. Mix in half the water with your hands, add the rest in smaller amounts until you get a soft, workable consistency.

Tip out onto a lightly oiled surface and knead for 5-10 minutes until elastic and smooth. Place in a large oiled bowl then place the bowl inside a plastic bag and leave to rise in a warm place for 1-3 hours or until the dough has doubled in size.

Meanwhile, slice the red onion into your preferred shape (I went for small, thin slices) and gently fry in 1 tbsp olive oil, with a crushed garlic clove and finely chopped rosemary for about 5 minutes, until softened. Throw in the balsamic vinegar and sugar and fry for a further minute.

When the bread has proved, tip out onto a lightly oiled surface and gently knead in the onion mixture. You might need a little more bread flour to offset the extra moisture. When the onion is evenly distributed, roughly shape into a rectangle and place in a deep, rectangular tray. Place the tray in a plastic bag and leave to prove once again in a warm place for around an hour.

Brush with about 1 tbsp olive oil before baking at 180-200°C/360-390°F/gas mark 4-6 for around 20-25 minutes until brown and hollow-sounding when tapped.

Enjoy with cheese, chutney or dipped in oil and balsamic vinegar. Scoffscoffscoff.

Tiramisu Cake

Standard

So George’s sister introduced us to our local Clandestine Cake Club. Each month they hold themed cake making/scoffing extravaganzas based on three simple principles:

1. You make a cake big enough to share
2. You get together and eat and share your cakes (and attempt conversations between mouthfuls of yumminess)
3. You take all sorts of cake home and get fat for the next week

This month’s theme was cakes based on other puddings or in other words, puddings masquerading as cakes. There’s no judging or egotism, just friendly people filling their faces as bemused members of then general public mosey on by. This tiramisu cake is based on the Smitten Kitchen tiramisu cake recipe, whose marsala cream is to die for. In fact, even if you don’t make the cake just make the cream and let spoon meet mouth.

Ingredients

For the coffee cake:

150g butter
120g sugar
150g self raising flour
3 eggs
1 tbsp baking powder
3 tbsp coffee essence such as camp coffee or very strong instant coffee

For the chocolate cake:

130g plain flour
40g cocoa
1 tsp baking powder
100g butter
2 eggs
120g sugar
120ml buttermilk (made simply by adding a tablespoon of lemon juice to milk and leaving for 10-15 minutes)
pinch salt
1 tsp vanilla essence

For the coffee syrup:

3 tbsp coffee essence (as above)
1 tbsp water
1 tbsp icing sugar

For the marsala cream:

250g marscapone
50g icing sugar
200ml double cream
1 tsp vanilla essence
2 tbsp marsala wine

Method

Preheat the oven to 160oC/320oF/gas mark 3  as you prepare the cakes and grease two 23cm (or thereabouts) cake tins.

For each of the two types of cakes, mix the dry ingredients together in separate bowls (sieved flour, baking powder, salt, sugar, cocoa). Add the butter and mix with an electric whisk until each turns to a sandy consistency. Add the respective flavourings.

In a separate bowl or mug, gently beat the eggs for one cake and add to the mixture a bit at a time, whisking until incorporated. Repeat with the eggs for the other cake. The coffee cake mixture is now ready to be poured into the cake tin and baked for 20-30 minutes. To the chocolate cake mixture, add the buttermilk and continue whisking until it becomes smooth. Pour into the second tin and bake for 20-30 minutes.

When baked, take the cakes out of the oven and mix up the coffee syrup in a small bowl. Drizzle evenly over the cakes and leave the cakes to cool fully.

To make the marsala cream, (which by the way, is extremely versatile and I challenge you not to eat any before it sees your cake) begin by beating the marscapone with the sieved icing sugar. In a second bowl, whisk the double cream until it forms stiff peaks. Add around a quarter of the cream to the marscapone mixture and mix thoroughly. Add the rest of the cream to the marscapone and fold very gently, so as not to lose the air from the mixture. When evenly mixed, store in the fridge until you’re ready to assemble your cake…if you can manage to not eat it all first.

To assemble the cake, place the chocolate cake on a plate or tray (the chocolate cake is slightly more structurally sound thus it makes sense for it to go on the bottom). Cover with a thick layer of marsala cream. Place the coffee cake on top. Spread the remaining marsala cream over the top. Dust with cocoa powder in some kind of pretty pattern. And go and join your local CCC!

Tadaaah!

How to bake the World’s Best Brownie

Standard

Brownies are great. Everybody loves a well baked brownie – you might know someone who doesn’t, but you only remember them because they are one in a million. This recipe is extremely versatile. It’s a rich, moist brownie that you can throw anything into to make it your own. The other great thing about this recipe is it is extremely difficult to get wrong – there is no danger of overmixing anything and it ending up as a chocolatey mess, and I have found that using the basic ranges of ingredients works just as well – just don’t tell anyone!

Ingredients

200g dark chocolate
250g unsalted butter (or baking spread/Stork)
300g sugar
1 tsp vanilla essence
4 large eggs
80g cocoa
1 tsp baking powder
65g plain flour

Method

Melt the butter and chocolate  in a bowl above a saucepan of boiling water slowly. You can do this in a saucepan directly, but just be sure to do it slowly and keep stirring it regularly – it will be fine. Add the sugar to a bowl (or a large jug) along with the vanilla essence. Pour in the chocolatey buttery mixture and stir well. Add the four eggs and mix thoroughly until smooth. Sieve the flour into the bowl and beat until smooth and silky – you can try very hard – but I have never found it possible to overmix this – just beating it with a wooden spoon until smooth works just fine. Line a brownie tin with baking paper (neatly – this is the most important bit!) and pour in the mixture. Gently bash the tin on the worktop Bake for around 15 minutes at 170° until the outside is cakey and the middle is still a bit squidgy. As a general rule – check your brownie and if it wobbles when you shake it – it needs longer – ideally 5 minutes after the time it stops wobbling. There is a varying degree of squidgyness so if you’re into eating your brownie with a spoon – you probably want to leave it for less time – mine turn out quite sturdy, but moist in the middle. This advice becomes very important when you start adding things like raspberries and cheeseecake topping.

Optional extras:

You might like to try adding chopped nuts, chocolate chips, cherries, fresh raspberries (you can add frozen too – but you’ll need to substantially increase the cooking time) or chopped stem ginger. Add to the mixture at the end.

If dark chocolate is not your thing – this recipe works just as well with milk chocolate – just knock the sugar down to 250g and the butter down to 200g.

Adding a cheesecake topping and swirling it through the mixture adds a wonderfully simple, yummy extra. Mix 150g cream cheese with 60g icing sugar and a tsp vanilla extract. Beat in one egg and dollop on top of the mixture. Swirl through with a skewer or knife. Alternatively pipe it in lines and sweep the skewer through it in alternate directions for a posh pattern.

You could use this mixture to create a base for a normal cheesecake, or a triple layered brownie cheesecake. I would recommend halving the recipe and adding the cheesecake and raspberry cream layers according to the recipe here. You could just as easily add a non-baked cheesecake mixture to the top of a thinner brownie base and chill to set. Any other ideas for how to use this ultimate brownie recipe would be greatly appreciated – post ideas below!

For more of our brownie ideas and thoughts, see Our Quest for the World’s Best Brownie.

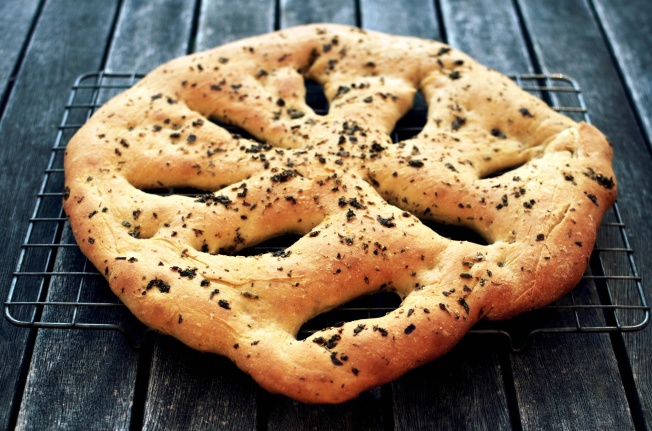
Fougasse

Standard

Ahh, Paul Hollywood, you make everything look so easy. I have to say I’m definitely becoming a better baker because of you. How To Bake is a genuinely brilliant book and I’ve probably peddled it before but I shall do so again – everything in it is begging to be made! Go buy it with your hard-earned pennies and get baking!

I’ve modified this recipe ever so slightly but only in the peripheral aspects not the major components. If you like focaccia, you’ll like this guaranteed.

Ingredients

250g strong white bread flour
190ml cold water
5g salt
5g fast-action yeast
1 tbsp oil*
3 tsp mixed herbs
handful fresh oregano, ripped up
handful fresh basil, ripped up

*I replaced PH’s suggestion of olive oil with the oil in which sundried tomatoes are preserved. I also chopped up the capers that came in my standard supermarket tomatoes and threw them over the bread with the other herbs. I must admit I must have used a fair bit more than 1 tbsp of oil too

Method

Sift the flour into a large bowl, add the salt to one side, yeast to the other, oil anywhere you like and three quarters of the water. PH says to use a mixer but a. I don’t have one and b. the exercise means you can eat twice as much bread! So shape your hand, dough-mixer-stylee and start mixing together in a circular motion.

Once everything is incorporated add the remaining water a little at a time, continuing to mix as vigorously as you can. Feel free to take a break every now and again! In the end I took mine out of the bowl, put plenty of oil on the work surface and kneaded it for 5 minutes before oiling the bowl and returning the dough to it. Cover with clingfilm and leave for at least an hour – my dough probably quadrupled in size.

Line a baking tray with baking parchment, dust a work surface with flour and semolina/polenta and tip the dough out on to it – save the clingfilm to use again later. Gently push out into a round and lift onto the baking tray before squishing out further. Make slits with a pizza cutter in a “leaf pattern” and gently pull the dough apart to emphasize the holes. Dust with flour and semolina/polenta, mixed herbs, basil, oregano and capers if you have any.

Preheat the oven to 220oC/425oF/gas mark 7. Cover the dough with the clingfilm and leave to prove while the oven warms up. Before you put it in the oven, drizzle with oil. Bake for 15 minutes or until golden brown. Tap the bread in various places to check it’s cooked through – it’ll have a lovely hollow sound. Cool on a wire rack and eat with an olive oil/balsamic vinegar dip.

J

fougasse


Coconut, Coriander, Chilli & Ginger Flatbread

Standard

The perfect, light airy flatbread to soak up a curry. Taken from the Real Food cookbook, with added coconut and spring onions. This makes one pretty enormous flatbread

Ingredients

400g strong white bread flour
320ml water
1½ tsp fast action yeast
1 tsp salt
3 tbsp dessicated coconut
2.5cm piece fresh root ginger
1 medium red chilli, deseeded & finely chopped
handful fresh coriander, ripped into pieces
2 spring onions, cut into thin rounds
olive oil

Method

Place a sheet of baking parchment on a baking tray and lightly flour a surface ready for your dough.

Sift the flour into a large bowl, add the salt to one side and the yeast to the other. Add half the chilli and coriander, 2 tbsp coconut and and most of the water. Use your hand to mix it all together, adding the remaining water a little at a time until you have a well-mixed, slightly wet dough. Tip out the dough and knead for 10 minutes.

Roll into a ball then squash down into a round – make sure to put more flour down to stop it sticking. Pick up and place on the baking parchment and squash out further until approximately 1cm thick. Dimple the surface with your fingers, add the remaining chilli, coriander, ginger, coconut and spring onions and give a healthy drizzle of olive oil. Cover with cling film and stick in a warm place to prove until doubled in size.

Preheat the oven to 190oC/375oC/gas mark 5. Remove the clingfilm and put the bread on the middle shelf for 25 minutes or until golden brown. Tap to check whether it’s cooked, it will sound hollow if it has, if not stick back in for 5 minutes. Either serve with a soggy curry or drizzle with oil and serve on its own.

J&W

not so flat flatbread

Ficelles [Thin Baguettes]

Standard

Ficelles are thin baguettes. They are absolutely gorgeous, extremely light and a wonderful accompaniment to soup! This recipe comes from Paul Hollywood’s excellent How To Bake, a book well worth investing in – there are so many recipes Whale & I want to make from it, everything is so tempting.

Mr Hollywood suggests using a mixer for this dough, however I used my hands and found it to be a very enjoyable dough to work with, even for a fairly novice breadmaker as myself! They’re relatively quick and painless to make (and even quicker to eat!)

Ingredients

250g strong white flour
200ml tepid water
5g fast-action yeast
5g salt
1 tbsp olive oil

Suggested toppings

Rosemary & Basil
Chilli Flakes & Cracked Black Pepper
Simple Sea Salt

Method

Line a square/rectangular 2-3 litre plastic tub with oil – a standard Tupperware lunch-sized box will do the trick!

Sieve the flour into a bowl – I find using a heavy bottomed bowl makes working the dough easier – if it sticks it doesn’t tend to pick the bowl up so readily. Add the salt to one side of the flour and the yeast to the other.

Add the water approximately 30-40mls at a time. Use your hand as a dough hook, mixing the dough together. Once each 30/40ml of liquid has been absorbed, knead for a few minutes before adding the next amount of water. This process took me approximately 20-25 minutes, but the dough was quite flexible (if a little sticky at times) and easily workable. Alternatively use a dough hook at medium speed for 8-10 minutes.

Once all the water is incorporated you should have a soft, stretchy dough. Add the olive oil and incorporate as before, using your hand like a dough hook. I found I was able to knead entirely with one hand, whilst using the other to steady the bowl and I’m only little! This gives you the advantage of having at least one clean hand if you ever need to do something urgent, like answering the phone!

After 5 or so minutes working in the oil tip the dough into the oiled container, add the lid (though don’t press it shut) and leave for at least an hour. I left mine for approximately 2 hours, just on a work surface and it quadrupled in size!

Meanwhile line two baking trays with parchment. Once your dough has at least doubled, tip out onto a floured work surface but don’t knock back – you want to treat it as gently as possible to keep its airy texture. Add a little flour to the top of the dough too.

Pull out into a rough rectangle approximately 10cm by 20-25cm. Mr Hollywood suggests cutting along the long edge, however, from experience, I think it would be easier to cut along the short edge as the dough has a tendency to adhere to itself. Cut each strip at approximately 2-3cm width and gently stretch out each strip lengthways a little before placing on the baking trays. Make slight indentations all along with your finger, drizzle over a little olive oil and add your topping of choice.

Once all on the trays, cover with clingfilm and leave for a further half hour. Meanwhile preheat the over to 220oC/425oF/Gas Mark 7. Place the ficelles in the middle and cook for 10-15 minutes until golden brown. Like I said, serve with soup and try not to scoff the whole batch in one go!

J

Pear & Rhubarb Crumble

Standard

So I am finally back at university after my 4 month summer…! Don’t get jealous now, I worked 8-5 every day, cycling to and from work, so I wasn’t dossing about. In fact university is somewhat of an easy ride in comparison! This year I am IN A HOUSE! Which, if you can’t tell from that exclamation, excites me greatly. This is the first thing I have cooked in my lovely new kitchen.

Being back at university, or more to the point in a city, means I get to indulge in one of my favourite activities: food bargain-hunting. You’d never guess which shop is the top of the pile when it comes to this particular sport: Waitrose. It’s a cheapskate’s paradise – they’re constantly reducing prices of going-out-of-date items all day, so no matter what time you go in you’re more than likely to find something. And if you time it just right, the patisserie/bakery mark down their fresh bread and cakes massively5p a doughnut? I’ll take 12 please! Having said all that, the rhubarb and pears for this recipe came from Sainsburys. 6 pears for 24p and 400g of rhubarb for 44p. Kerching. But I couldn’t mention the bargain-hunting without passing on my little tip.

But shhhh, it’s just between us, right?

Serves 6-8.

Ingredients

Filling

5 small pears, chopped
400g rhubarb (approx. 3-4 sticks), chopped
1 thumb-sized piece of ginger
sugar, to taste

Topping

225g flour
125g butter
60g sugar

optional:
handful chopped almonds/walnuts
couple handfuls raisins
couple handfulls oats
sprinkling cinnamon

Method

Preheat oven to 200oc/400oF/gas mark 6. Put the pears in a pan, add enough water to just cover them and heat to boiling then reduce to a simmer. Stir every so often until the fruit starts to soften. If you want your rhubarb as a sort of thick sauce add it when the fruit is harder, if you want the rhubarb to maintain some of its structure then add it when the fruit is softer. Once cooked/reduced, grate in the ginger and taste, adding sugar if the fruit is too tart.

For the topping, sieve the flour and sugar into a bowl and add the butter in small pieces. Use your hands to form crumbs, making sure there are no large clumps of butter. If your crumble is too “dusty” add a little more butter, if it is too clumpy add a tad more flour. Once you have reached the desired breadcrumb consistency and if you are including them stir in the s, raisins and oats.nuts

Pour the fruit into a large oven proof dish and tip the crumble on top, smoothing it across the surface. Sprinkle with sugar and cinnamon and stick in the oven for half an hour, or until golden brown and bubbling.

Hey presto! Serve with custard. Or cream. Or ice-cream. Or be a fatty and do all three. Winner.

J

Savoury Swirls, Two Ways

Standard

So it was my last day at work on Wednesday and as is customary whenever something moderately eventful takes place (birthday, being late, being early, being alive…) it is expected you bring in something edible. Almost always the food tends towards the sweet and absolutely always, unless I’ve had anything to do with it, is shop-bought. But not today, ohhh no!

The recipe for the dough for these delightful savoury snacks is stolen completely from Brendan of The Great British Bake-Off Fame. The fillings, however are entirely my own creation.

I doubled Brendan’s quantity and made a lot (we’re talking tipping the scales at over 100 here) roughly 2 inch diameter by 1 inch high swirls. So I’m going to halve his recipe which should give you approximately 20-24 swirls.

Ingredients

Dough

400g plain flour
10g dried yeast, reactivated
6g salt
50ml olive oil
250ml warm water

Balsamic Red Onion, Cheese & Ham

2 red onions, diced
90g gruyére
30g gouda
30g cheddar
2 slices ham, diced
splash balsamic vinegar
pinch of sugar
salt/pepper/’erbs/spices to taste

Pesto, Feta & Sundried Tomato

100g feta, crumbled
50g pesto
8 sundried tomato, chopped
handful fresh basil, ripped
2 tomatoes, grilled & skinned
1 red pepper, grilled & skinned

Method

Dough

In a bowl mix the flour and salt and the oil a few glugs at a time, stirring between each glug to incorporate it. Do the same with the reactivated yeast, stirring in a little at a time and then finally with the water.

**Note: if you are reactivating yeast in water, remember to take away that quantity of water from the 250ml you need to add. It’s 250ml total, not 250ml + reactivated yeast water!**

Drizzle a little oil in the bowl, place the dough in, rolling it around in the oil so as it grows it doesn’t stick to the sides. Put in a warm place – airing cupboards are great – and leave to double in size (approx. 40-60 minutes). Meanwhile make your filling/s.

Balsamic Red Onion, Cheese & Ham

Heat a dash of oil in a frying pan over a medium heat. Add the diced onions and sweat for a couple of minutes, before adding a good glug balsamic vinegar and a sprinkling of sugar/golden syrup, salt, pepper and whichever herbs and spices you fancy (I went for W’s recommendation of rosemary and basil). Continue to sweat for 6-7 more minutes, adding a little water if your pan goes dry. Remember the onions will continue to cook in the oven so leaving them with a little bite left in them is probably a wise move!

Grate all your cheese into a bowl, add the chopped ham, a good few twists of pepper and hey presto your filling is ready

Pesto, Feta & Sundried Tomato

Optional: Removing Pepper & Tomato skins

Cut the pepper and tomatoes into quarters, removing all the pips/liquidy innards. Place under a hot grill, skin side up for a few minutes, until the skin is blackened over the majority of the surface – you may need to manoeuvre them around to achieve this. Once the skin is blackened add them to a sandwich bag, seal and leave to steam for a further few minutes. The skin should start to peel away and you can finish the job with your fingers. It can be a bit tricky and in all honesty I’m not sure whether it’s worth it but I’ve put it up here for you to make your own decisions! Finally chop/rip them up into small chunks.

Crumble the feta into a bowl and add the chopped sundried tomatoes and basil leaves.

Roly-Poly Time

When the dough has doubled in size, remove and place on a floured surface. Flour your rolling pin (it will stick due to the oily nature of the dough) and roll out into a rectangle approx 4mm thick, where the long side is approximately twice that of the short side. Then either:

1. Sprinkle the entire thing with the balsamic red onions, then cheese and ham – aim for a roughly even coverage.

Or

2. Spread a thin layer of pesto over the surface before adding the crumbled feta, sundried tomatoes, basil, and grilled peppers/tomato chunks

Roll up (roll up!) from one long side to the other, slice into rounds 1 inch thick and place on baking paper on an oven tray. Here you can “re-prove” your dough for half an hour back in the warm, or you can just whack them straight in the oven, preheated to 190oC/375oF/gas mark 5 for approximately 30-40 minutes, or until golden brown. After half an hour take one out, cut it in half and see whether it’s still doughy inside – if so stick back in for a few minutes then check again.

Serve piping hot – they taste pretty good cold but nowhere near as good as straight from the oven. Share amongst friends and work colleagues…or, y’know, scoff the lot y’self.

J(&W a bit)

Balsamic Red Onion, Cheese & Ham

Feta, Pesto, Sundried Tomato & Red Pepper

Our Quest for the World’s Best Brownie

Standard

Brownie has to be our favourite treat ever. With tea, for pudding, even for breakfast, it’s just amazing and a very well loved bake in both our houses, day or night. After realising just how much we love it, we decided to try and find the most amazing brownie recipe, in the world, ever. We have now developed our top three recipes and our top three bought-brownies (though our opinions on the matter do differ). But here’s the shortlist for now.

Best brownie recipes

After some disagreement, we decided to have two number 1s.

Joint 1. Most indulgent brownie.

200g dark chocolate
250g unsalted butter
80g cocoa
1 tsp baking powder
65g plain flour
300g sugar
4 large eggs
dash of vanilla essence

Melt the butter and chocolate  in a bowl above a saucepan of boiling water. Add the sugar to a bowl along with the vanilla essence. Pour in the chocolatey buttery mixture and stir well. Add the four eggs and mix. Sieve the flour into the bowl and beat until smooth and silky. Line a brownie tin with baking paper (neatly) and pour in the mixture. Bake for around 15 minutes at 170° until the outside is cakey and the middle is still a bit squidgy.

Joint 1. Best store-cupboard brownie

100g dark chocolate
100g unsalted butter
200g sugar
1 tsp vanilla essence
2 large eggs
125g plain flour
2 tbsp cocoa (can be left out to make a less rich but gooier brownie)

Method as above, baking time is around 20 minutes.

3. Best brownie-style dessert: raspberry cheesecake brownie

BROWNIE
200g dark chocolate (save one square from the bar for the topping)
200g unsalted butter
250g icing sugar
3 eggs
110g plain flour

CHEESECAKE
400g cream cheese
150g icing sugar
1/2 tsp vanilla essence
2 eggs

TOPPING
300ml whipping cream
100g icing sugar
150g raspberries
1 square of chocolate (if you can trust yourself to not eat it whilst baking)

Make the brownie: melt the chocolate and meanwhile, cream the butter and sugar. Add eggs to the creamed butter and sugar one at a time and mix gently. Beat in the flour and mix until smooth. Add the chocolate and pour into a lined tin.
Make the cheesecake: combine the cheese, sugar and vanilla, beat until smooth. Add eggs one at a time and be careful not to mix too vigorously as the eggs will separate. Pour on top of the brownie mixture.

Bake for 30-40 minutes until firm. Allow to cool.

Make the topping: whip the cream and sugar until firm. Options here are to: add some raspberry juice to the cream mixture or add a few whole raspberries to the mixture to give it a nice pink colour. Do not cheat and add pink food colouring. This is not cool. Spread the pink cream over the cheesecake layer and press whole raspberries onto the top. Sprinkle over some grated chocolate if you’re feeling extravagant.

Best bought brownie

1. COOK Boston Brownie (W’s favourite)

Don’t be put off by the fact this brownie normally lives in the freezer, it is incredibly tasty and the fact it freezes is just a bonus. We bought it from a lovely frozen-food shop in Bristol, but have since learned you can buy it online here.

2. Kemi’s Café chocolate brownie, served warm with cream (J’s favourite)

They serve a huge range of cakes at Kemi’s café in Cardiff bay so we were in luck that we visited the day they had made brownies. Despite having visited several times since, I haven’t seen them again. Maybe next time, we’ll ask for the recipe and bake our own because life without these brownies just isn’t the same. Their menu doesn’t do them justice as a lot of the dishes change and it really depends what they’re making on the day.

3. Entropy’s brownie, served with raspberry sorbet

A huge helping of brownie with a lovely raspberry sorbet melting on the top. It made a incredible pudding and we would definitely order it again, but not quite good enough to bake at home. Check out their menu here but note that it changes regularly.

Having said all this, the point should be made that this is an ongoing quest. We will strive, for the good of people everywhere, to eat brownie until we burst in pursuit of perfection. That’s right, we’re just that nice.