Grapefruit & Ginger Cake

Standard

The Sunday just gone marked our second attending at Leicester’s excellent Clandestine Cake Club, this time at Deli Flavour in the recently refurbished Silver Arcade. The theme this month was “Memory Lane”, though I must shamefully admit that the caked I baked has no link to memories whatsoever. I just fancied baking a grapefruit cake, so I err…did.

Before I divulge the recipe, I would like to draw attention to the fact that on 3rd May I shall be cycling 100 miles to raise money for Alzheimer’s Research and YoungMinds. Please follow this link if you would like to donate, which would make me and my little legs very happy indeed! In some crazy twist of fate I also believe this is our 100th post. Huzzah!

Ingredients

Cake

1 grapefruit
250g sugar
225g stork/butter/spread
3 eggs
300g self raising flour
1 tsp baking powder
1 tsp cinnamon
1 tsp ground ginger

Icing

50g stork/butter/spread
200g cream cheese
300g icing sugar
zest of a lemon
2 stem ginger balls, finely sliced

Method

Boil the grapefruit in a pan for 20 minutes, drain the water, then repeat. (I must admit I don’t entirely understand the change of water but the recipe told me to so I did!). Leave the grapefruit to cool before removing pips and blending to a pulp (the whole thing, including skin).

Preheat the oven to 18ºC/350ºF/gas mark 4Beat the stork and sugar together. Beat in the eggs one at a time, followed by the pulp. Fold in the flour, baking powder, cinnamon and ground ginger. Divide the mix between two well greased/lined 20cm cake tins. Bake for 20-25 minutes until golden brown. Leave in the tins for a few minutes before turning out onto a cooling rack.

To make the icing, beat the butter and half the icing sugar together. Add the cream cheese, remaining icing sugar, zest and sliced stem ginger and beat until smooth. Keep in the fridge until the cake has cooled enough to ice it. Spread half the icing on each sponge, starting in the centre and spreading it outwards in ever increasing circles. For the bottom layer leave a 1-2cm gap around the edge so that when you place the upper layer on top the icing doesn’t splurge out. Place one on top of the other, decorate with a few strips of lemon zest. Share with friends at your local cake club!

J

DSC_0771

Chicken Tagine with Spinach, Olives & Preserved Lemons

Standard

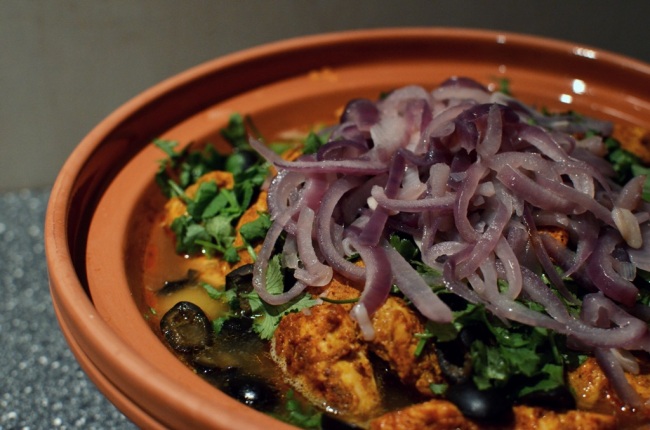
Whale received multiple Moroccan themed ingredients and a tagine for her birthday so naturally this is the result. On a side note we’re also going to Marrakech in the summer. I’m sure you could do this without using a tagine – a large casserole dish would probably suffice. Recipe modified from a gorgeous book – The Food of Morocco.

Ingredients

Marinade

1 tsp paprika
1 tsp ground cumin
1½ tsp ground ginger
½ tsp garlic paste or 1 clove crushed
good pinch of salt and pepper
1 tbsp oil
1 tsp of lemon juice

Tagine

4 chicken breasts, cut into large chunks
3 medium red onions, halved and thinly sliced
2 garlic cloves, thinly sliced
2 pickled lemons, quartered
few strands of saffron
1 cup red lentils, rinsed
good handful spinach
200ml chicken stock
½ tsp turmeric
½ tsp cinnamon
handful pitted olives
large handful fresh coriander, chopped

Method

Make up marinade in a large sandwich bag (or a plastic bowl). Add the chicken, give a good squidge around and stick in the fridge for a few hours.

When ready to cook, put the saffron in 2 tbsp warm water. In a large frying pan sweat the onions over a medium heat for 5 minutes, then add the garlic for and sweat for a further 2-3 minutes. Tip half the onions into the tagine (put the other half to one side) add the chicken stock and saffron water, then layer over with lentils and spinach.

In the frying pan fry the chicken with the cinnamon and turmeric then once sealed add on top of the spinach, with the preserved lemon quarters. Stick the tagine in a cold oven and put on 160oC/320oC/gas mark 3 for 45-60 minutes. 5 minutes before serving take the tagine out, top with the remaining onions, olives and chopped coriander and stick back in the oven. Serve with a side order of tagine bread (recipe to come).

Image

Red Onion & Rosemary Bread

Standard

Image


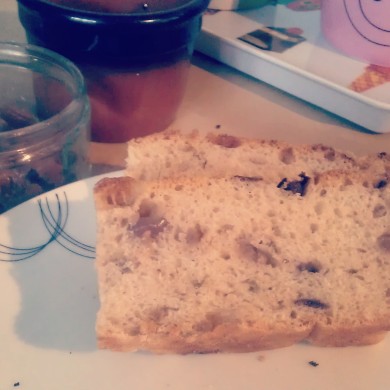
I couldn’t decide what kind of bread to make so just made up a basic bread dough while I mulled it over in my mind palace and came up with this bread bad boy. Boom.

Ingredients

400g strong white bread flour
7g instant yeast
7g salt
250ml lukewarm water
1 large red onion
1 garlic clove
small handful of rosemary sprigs
2 tbsp olive oil
2 tbsp balsamic vinegar
1 tsp soft brown sugar

Method

Begin by making the simple bread dough. In a large bowl, weigh out the flour, salt and yeast – remembering to keep the salt and yeast on opposite sides. Mix in half the water with your hands, add the rest in smaller amounts until you get a soft, workable consistency.

Tip out onto a lightly oiled surface and knead for 5-10 minutes until elastic and smooth. Place in a large oiled bowl then place the bowl inside a plastic bag and leave to rise in a warm place for 1-3 hours or until the dough has doubled in size.

Meanwhile, slice the red onion into your preferred shape (I went for small, thin slices) and gently fry in 1 tbsp olive oil, with a crushed garlic clove and finely chopped rosemary for about 5 minutes, until softened. Throw in the balsamic vinegar and sugar and fry for a further minute.

When the bread has proved, tip out onto a lightly oiled surface and gently knead in the onion mixture. You might need a little more bread flour to offset the extra moisture. When the onion is evenly distributed, roughly shape into a rectangle and place in a deep, rectangular tray. Place the tray in a plastic bag and leave to prove once again in a warm place for around an hour.

Brush with about 1 tbsp olive oil before baking at 180-200°C/360-390°F/gas mark 4-6 for around 20-25 minutes until brown and hollow-sounding when tapped.

Enjoy with cheese, chutney or dipped in oil and balsamic vinegar. Scoffscoffscoff.

Tiramisu Cake

Standard

So George’s sister introduced us to our local Clandestine Cake Club. Each month they hold themed cake making/scoffing extravaganzas based on three simple principles:

1. You make a cake big enough to share
2. You get together and eat and share your cakes (and attempt conversations between mouthfuls of yumminess)
3. You take all sorts of cake home and get fat for the next week

This month’s theme was cakes based on other puddings or in other words, puddings masquerading as cakes. There’s no judging or egotism, just friendly people filling their faces as bemused members of then general public mosey on by. This tiramisu cake is based on the Smitten Kitchen tiramisu cake recipe, whose marsala cream is to die for. In fact, even if you don’t make the cake just make the cream and let spoon meet mouth.

Ingredients

For the coffee cake:

150g butter
120g sugar
150g self raising flour
3 eggs
1 tbsp baking powder
3 tbsp coffee essence such as camp coffee or very strong instant coffee

For the chocolate cake:

130g plain flour
40g cocoa
1 tsp baking powder
100g butter
2 eggs
120g sugar
120ml buttermilk (made simply by adding a tablespoon of lemon juice to milk and leaving for 10-15 minutes)
pinch salt
1 tsp vanilla essence

For the coffee syrup:

3 tbsp coffee essence (as above)
1 tbsp water
1 tbsp icing sugar

For the marsala cream:

250g marscapone
50g icing sugar
200ml double cream
1 tsp vanilla essence
2 tbsp marsala wine

Method

Preheat the oven to 160oC/320oF/gas mark 3  as you prepare the cakes and grease two 23cm (or thereabouts) cake tins.

For each of the two types of cakes, mix the dry ingredients together in separate bowls (sieved flour, baking powder, salt, sugar, cocoa). Add the butter and mix with an electric whisk until each turns to a sandy consistency. Add the respective flavourings.

In a separate bowl or mug, gently beat the eggs for one cake and add to the mixture a bit at a time, whisking until incorporated. Repeat with the eggs for the other cake. The coffee cake mixture is now ready to be poured into the cake tin and baked for 20-30 minutes. To the chocolate cake mixture, add the buttermilk and continue whisking until it becomes smooth. Pour into the second tin and bake for 20-30 minutes.

When baked, take the cakes out of the oven and mix up the coffee syrup in a small bowl. Drizzle evenly over the cakes and leave the cakes to cool fully.

To make the marsala cream, (which by the way, is extremely versatile and I challenge you not to eat any before it sees your cake) begin by beating the marscapone with the sieved icing sugar. In a second bowl, whisk the double cream until it forms stiff peaks. Add around a quarter of the cream to the marscapone mixture and mix thoroughly. Add the rest of the cream to the marscapone and fold very gently, so as not to lose the air from the mixture. When evenly mixed, store in the fridge until you’re ready to assemble your cake…if you can manage to not eat it all first.

To assemble the cake, place the chocolate cake on a plate or tray (the chocolate cake is slightly more structurally sound thus it makes sense for it to go on the bottom). Cover with a thick layer of marsala cream. Place the coffee cake on top. Spread the remaining marsala cream over the top. Dust with cocoa powder in some kind of pretty pattern. And go and join your local CCC!

Tadaaah!

Carrot & Chickpea Burgers

Standard

I don’t know about you but when faced with a bag full of carrots and not much else I struggle to think of anything other than ‘soup’. However a quick browse on the BBC Good Food website unearthed these burgers. They’re a little more faffy than standard chickpea burgers but they stuck together better than any I’ve previously made so I thought I’d share the method.

Makes 6-8 burgers

Ingredients

350-400g carrots, grated
400g tin chickpeas, drained/rinsed
1 onion, grated
1 clove of garlic, grated
1 tbsp tahini or hummus or maybe even…smooth peanut butter?
1 egg
80-100g breadcrumbs (1 thick slice of bread, grated)
1 tsp ground cumin1 tsp ground ginger
1 tsp ground coriander
salt and pepper to taste
flour

Method

If you have a food processor (which I don’t!) add 1/3 of the carrot, the chickpeas, onions, garlic, spices, hummus/tahini/peanut butter and egg and blitz to a paste. If you don’t have a food processor stick them in a large bowl and use a stick blender to blitz. If you don’t have a stick blender then maybe this recipe is not for you…!

Add a little oil to a frying pan and fry the remaining 2/3 of the carrot for approx. 10 minutes. Add to the paste in the bowl  along with the breadcrumbs and stir together. Get a large plate and cover with a layer of flour. Use your hands to form the carrot mix into patties (eurghk, I hate that word) and place on the flour. Handling gently, flip over and coat the other side in flour.

Using the same frying pan, to save on washing up obviously, fry up the burgers for a few minutes on each side, until golden and crispy. Serve with salad, chutney, flatbreads, mayo, whatever!

No picture ’cause we too greedy. Sozz.


J

Meen Molee [South Indian Fish in Coconut Milk]

Standard

Very quick and very straightforward. I made this, just about, after coming home from an 80 km bike ride with feet I couldn’t feel and hands I couldn’t stop shaking. And it still turned out alright. So it can’t be that hard…! Adapted from Mighty Spice.

Ingredients

4 garlic cloves
2.5cm ginger
2.5cm fresh turmeric (use a teaspoon of ground turmeric)
1 large onion, diced
1 large tomato, chopped
500g white fish fillet, cut into bite-sized pieces
400ml can coconut milk/cream
juice of 1 lime
1 tsp curry powder
handful of green beans
1 carrot, peeled into slivers

Method

Mince the garlic, ginger and turmeric together into a paste. If you have one use a mini blender, but I don’t so I made do with a stick blender, a large mug and a little oil.

Fry up the onions for 5 minutes over a medium heat. Add the paste and tomato and cook for a couple more minutes. Add the coconut milk and lime juice and season with salt. Stir, bring to the boil, reduce to a simmer and add the fish. Cook for 5 minutes before adding the carrots and beans then continue until fish is cooked through (approx. 3-4 minutes).

Sorry, no piccy. Wouldn’t have been able to hold the camera probably…

Roasted Squash & Blue Cheese Risotto

Standard

For some reason risotto has never really appealed to me. This recipe has made me change my mind. And look, two posts in two days! Shocking.

Serves 4-5, or 2 with plenty of leftovers!

Ingredients

1 medium-large butternut squash, cubed (2cm)
1 large onion, diced
1 garlic clove, finely chopped
300g risotto rice
1.2l vegetable stock
150ml white wine
100-150g blue cheese (we used Danish Blue)
few sprigs of rosemary
1 cup of peas
salt, pepper, basil, oregano

Method

Heat the oven to (200°C/400°F/gas mark 6). Coat the bottom of a roasting tin with some oil, couple of sprigs of rosemary and a sprinkling of black pepper. Add the butternut squash and turn over to coat. Stick in for 20 minutes or so, giving a good shufty every now and again.

Meanwhile heat up a tablespoon of oil in a deep pan. Gently soften the onions for a few minutes before adding the garlic. Stir often so that the onions do not brown. Add the rice and stir well, the rice needs to just gently heat up before you can add the liquid. Stick the kettle on to boil and make up the vegetable stock. After 2 minutes, add the wine – stir well to allow the rice to soak it all up. As the pan dries out somewhat, add a small amount of the stock (around 100-200mls at a time). Wait for the liquid to be nearly all soaked up then add another 100-200ml.

Keep adding stock like this and stir frequently. After half the stock has been added, throw in the herbs. After around 20 minutes, check to see if the rice is soft. Turn off the oven, take out the butternut squash and mash half, returning the other half to the oven to keep warm. Stir in the mashed butternut squash, peas, most of the cheese and heat thorough – you may need a drop more water depending on how saucy you like your risottos. If the rice needs a bit more time to cook, carry on adding small amounts of hot water until cooked, before adding the squash, peas and cheese. Don’t be afraid of adding more water if necessary – it’s really important not to let the risotto boil dry.

Serve in a bowl with a few cubes of butternut squash and crumble over the rest of the cheese. Enjoy your warming winter grub!

Picture to follow…!

J

Sweet Potato Cottage Pie

Standard

aka Jelly’s Miraculous Return from being a massive lazy bum.

So, I’ve been terribly rubbish and awful with not posting for like 6 months so I do apologise about that. Here’s a proper tasty, easy peasy cold January kind of a recipe. Adapted from BBC Good Food. Totally customisable to your taste.

P.S. Happy New Year!

Serves 4 very well, 5 quite well and 6 well

Ingredients

3 onions, chopped
2 garlic cloves, finely chopped
3 medium carrots, chopped
hefty sprinkling of thyme
300-400g minced beef/lamb
100g puy lentils
1 cup of peas
flour to thicken, if necessary
1l stock (beef or vegetable)
3 medium sweet potatoes, cut into 2cm cubes
3 large potatoes, cut into 3cm cubes
150g yoghurt
salt and pepper
2 tsp ground coriander
2 tsp ground turmeric
2 tsp ground paprika
few handfuls grated cheese

Method

Heat some oil in a large/deep saucepan. Sweat the onions for 5 minutes then throw in the garlic, thyme and carrots. Cook for 5 more minutes before adding the mince, stirring and breaking it up with a wooden spoon. Once fully browned add the lentils and stock. Simmer for 30 minutes or so, until nicely thickened – add flour if necessary.

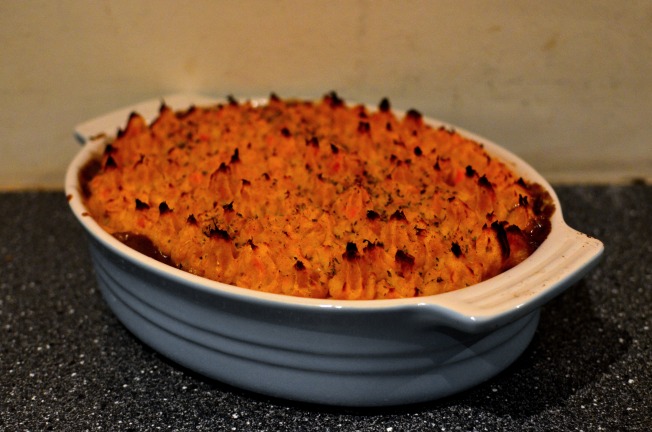
Meanwhile stick all your potatoes in another large saucepan. Boil until soft, then drain and mash with the yoghurt. Season to taste, add the peas and stick in a large casserole dish. Cover the meaty mixture with the mash (if you’re feeling fancy you could pipe it, but if not just stripe with a fork). Stick in the oven (180°C/350°F/gas mark 4) until the mash begins to crisp then add the cheese and cook for a further ten minutes.

Picture soon to follow…!

Scrummy Pie

See, told you so.

J

Homemade Chai in a Bottle

Standard

Makes approx. 1.5 litres chai concentrate

Ingredients
10 tea bags
2 cinnamon sticks
80g light brown sugar
3-inch piece of root ginger, grated
10 whole cloves
½ teaspoon freshly ground nutmeg
2 whole star anise
1 tsp fennel seeds
½ teaspoon of whole black peppercorns
peel of one orange (I peeled it like an apple, so the large strips won’t fit through the sieve at the end)
1 tablespoon of vanilla extract

Method

Add all ingredients except the teabags and vanilla extract to a large saucepan along with a litre of water and bring to the boil. Boil around 800ml water in a kettle and add to the teabags. Leave to soak for a few minutes and squeeze. Add the tea to the pan. Simmer for 20-30 minutes before straining to remove the bits. Add the vanilla extract and decant into bottles whilst still warm. Seal the bottles and allow to cool.

Store in the fridge once cool. I would guess (though this hasn’t been tested) it would keep for 2-4 weeks unopened and 2 weeks once opened. When required, pour out around 2cm of syrup (more or less depending on taste) into a cup before topping up with hot milk or boiling water.

Makes a great Christmas gift all dressed up with ribbons, tags and a cinnamon stick and would also be nice as a flavouring in cakes and traybakes.

Feta and Roasted Vegetable Bulghar-Wheat Salad

Standard

This tasty salad makes a nice change from the old ham sandwiches. It’s really easy to make and lasts all week so I tend to make a huge tub of it on a Sunday and it will keep until Friday – not that it ever really lasts that long. It looks really posh too.

Serves: 6-8

Ingredients

1/2 butternut squash, diced into 1-2 cm cubes
1/2 courgette, diced into 1-2 cm cubes
1 medium sweet potato, diced into 1-2 cm cubes
1 tbsp sunflower oil
1 cup of bulghar wheat
1 vegetable stock cube
handful spinach, chopped
100g feta
1 tbsp dried basil
1 tbsp dried oregano
4 tomatoes, chopped
salt and pepper

Method

Heat the oven to 160*C whilst you prepare the vegetables. Throw them into a bowl and coat well in the sunflower oil. Add a teaspoon of each of the herbs and put on a baking tray in the oven to roast for 40-50 minutes until soft. Leave to cool.

Meanwhile, add the bulghar wheat to the a bowl and cover with two cups of boiling water. Add the stock cube and stir well. Cover with clingfilm and leave to soak for 10-15 minutes, stirring a couple of times.

When the bulghar wheat has soaked up the water, add the vegetables to it. Leave to cool before crumbling over the feta, adding the herbs and adding the chopped spinach. Chop the tomatoes and add to the salad. Season well and store in the fridge.